
Supervised Fine Tuning - Step by Step
Using Unsloth on Google Colab with Hugging Face

There is an assumption that Supervised Fine Tuning is a very difficult and highly technical process. In this article I’m going to walk step-by-step through the fine tuning process so you can see that it is not a difficult process and you don’t even need to understand how each step works.
Prerequisites
A Google Colab Account: https://colab.research.google.com/
A Hugging Face Account: https://huggingface.co
A Hugging Face Token
Step 1: Set Runtime Options
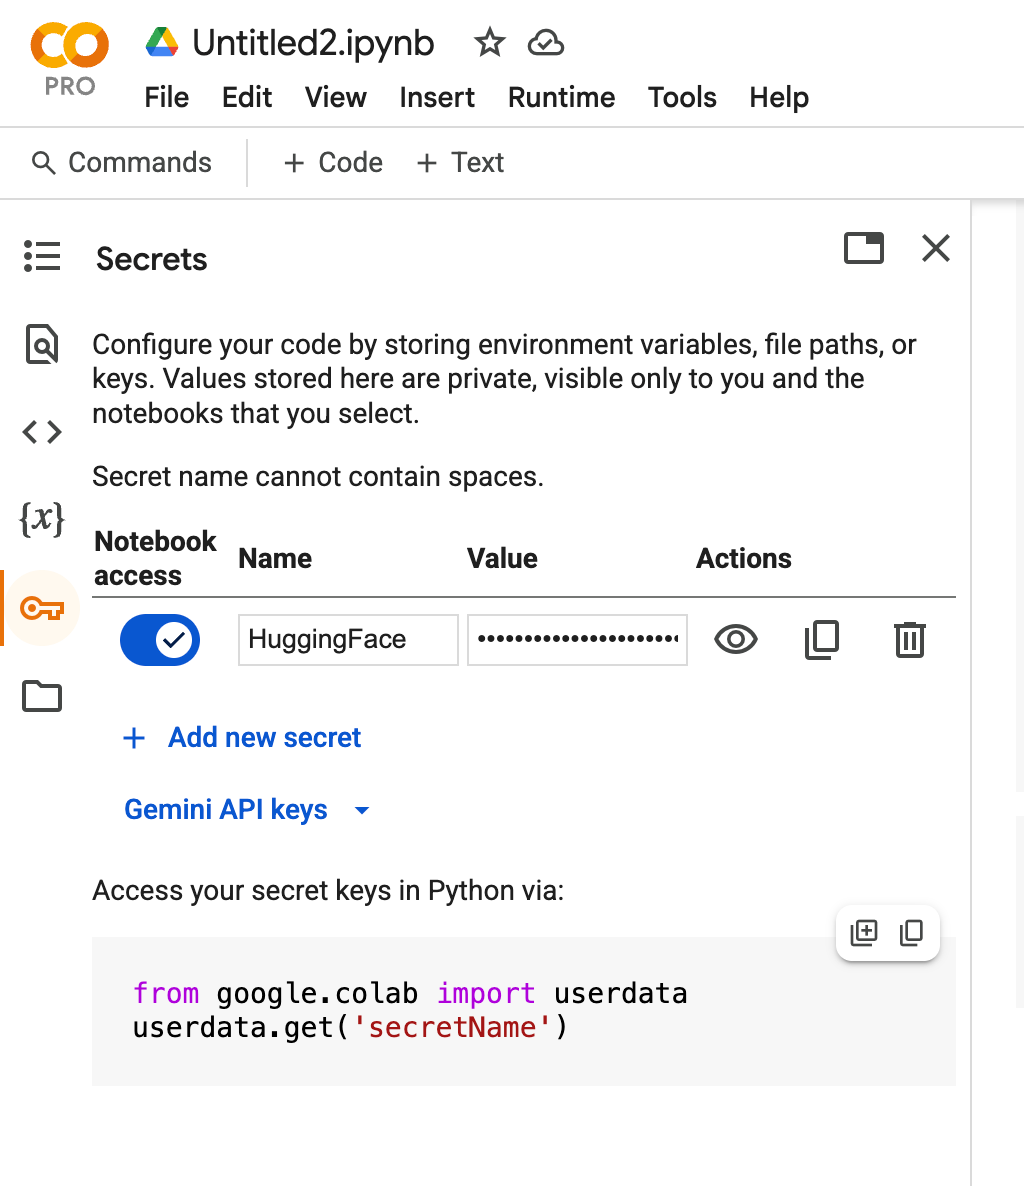
Setting the runtime options involves activating a GPU for your runtime environment and activating your Hugging Face token.
Change the Runtime Type to include a GPU
Activate your Hugging Face Token
Step 2: Install Unsloth
This step installs the unsloth library which supports NVIDA GPUs. The installation of unsloth is very long so don’t be surprised if it takes several minutes. If errors occur at the end of a long installation processn you can probably ignore the error. If the error happens right away, you probably forgot to activate a GPU.
!pip install unslothStep 3: Import PyTorch & FastLanguage Model
PyTorch and FashLanguageModel are the critical libraries used by the SFT process we are using.
from unsloth import FastLanguageModel
import torch
Step 4: Set Variables
In this process we are are using the max sequence of 2048 and 4 bit quantization. This step just steps the variables used later.
max_seq_length = 2048
dtype = None
load_in_4bit = True
Step 5: Login to Hugging Face
This is very generic code for pulling a token from the key store within Google Colab and using it to log into Hugging Face.
from huggingface_hub import login
from google.colab import userdata
hf_token = userdata.get('HuggingFace')
login(hf_token)
Step 6: Create Model & Tokenizer
The variables set in Step 4 are used to create the tokenizer and the model pulled from Hugging Face. In this case we are using the DeepSeek-R1-Distill-Llama-8B as the model we are fine tuning. Since the model is greater than 5GB in size, this step may take several minutes.
model, tokenizer = FastLanguageModel.from_pretrained(
 model_name = "unsloth/DeepSeek-R1-Distill-Llama-8B",
 max_seq_length = max_seq_length,
 dtype = dtype,
 load_in_4bit = load_in_4bit,
 token = hf_token,
)
Step 7: Set Prompt Style
A variable is created the contains the prompt style. This matches the prompt style from the data set we will download from Hugging Face in Step 10.
prompt_style = """Below is an instruction that describes a task, paired with an input that provides further context.

Write a response that appropriately completes the request.

Before answering, think carefully about the question and create a step-by-step chain of thoughts to ensure a logical and accurate response.

### Instruction:

You are a medical expert with advanced knowledge in clinical reasoning, diagnostics, and treatment planning.

Please answer the following medical question.

### Question:

{}

### Response:

<think>{}"""
Step 8: Test the Model Before Training
This step calls the model we downloaded in Step 6 to ensure it was loaded properly. A question is created and the model is called from Python.
question = "A 28-year-old woman presents with a 3-week history of an intensely itchy, red, and scaly rash on the flexor surfaces of her elbows and behind her knees. She reports a personal history of asthma and seasonal allergies. Physical examination reveals lichenification and excoriations in the affected areas. What is the most likely diagnosis, and what is the primary immune pathway involved in this condition?"

FastLanguageModel.for_inference(model)

inputs = tokenizer([prompt_style.format(question, "")], return_tensors="pt").to("cuda")

outputs = model.generate(
 input_ids=inputs.input_ids,
 attention_mask=inputs.attention_mask,
 max_new_tokens=1200,
 use_cache=True,
)

response = tokenizer.batch_decode(outputs)
print(response[0].split("### Response:")[1])
Step 9: Initialize the Model
This step initialize unsloth and defines the target modules for the training process.
model = FastLanguageModel.get_peft_model(
 model,
 r=16,
 target_modules=[
"q_proj",
"k_proj",
"v_proj",
"o_proj",
"gate_proj",
"up_proj",
"down_proj",
 ],
 lora_alpha=16,
 lora_dropout=0,
 bias="none",
 use_gradient_checkpointing="unsloth",
 random_state=9001,
 use_rslora=False,
 loftq_config=None,
)
Step 10: Set the Training Prompt Style
This step duplicates Step 7 but for a different variable to define the training prompt style. In this case an extra <think> tag pair is added to force the training prompt to perform a reasoning step.
train_prompt_style = """Below is an instruction that describes a task, paired with an input that provides further context.

Write a response that appropriately completes the request.

Before answering, think carefully about the question and create a step-by-step chain of thoughts to ensure a logical and accurate response.

### Instruction:

You are a medical expert with advanced knowledge in clinical reasoning, diagnostics, and treatment planning.

Please answer the following medical question.

### Question:

{}

### Response:

<think>

{}

</think>

{}"""
Step 11: Create the Formatting Function
A custom formatting function is created to transform the data in each line of the data set into the format defined by the train prompt style defined in Step 10. In Step 12, this function is called as an inline function,
EOS_TOKEN = tokenizer.eos_token # Must add EOS_TOKEN

def formatting_prompts_func(examples):
 inputs = examples["Question"]
 cots = examples["Complex_CoT"]
 outputs = examples["Response"]
 texts = []

for input, cot, output in zip(inputs, cots, outputs):
 text = train_prompt_style.format(input, cot, output) + EOS_TOKEN
 texts.append(text)
return {
"text": texts,
 }
Step 12: Load the Dataset
In this step, the first 500 records from the dataset are loaded into the dataset variable and mapped using the mapping defined in step 11. At the end of the load process the first record is displayed on the screen.
from datasets import load_dataset

dataset = load_dataset("FreedomIntelligence/medical-o1-reasoning-SFT","en", split = "train[0:500]",trust_remote_code=True)

dataset = dataset.map(formatting_prompts_func, batched = True,)

dataset["text"][1]
Step 13: Setup the Trainer Parameters
The main work of the SFT process is performed by the trainer.train() function. In this step, the parameters used by the function are set prior to the function being called.
from trl import SFTTrainer
from transformers import TrainingArguments
from unsloth import is_bfloat16_supported

trainer = SFTTrainer(
 model=model,
 tokenizer=tokenizer,
 train_dataset=dataset,
 dataset_text_field="text",
 max_seq_length=max_seq_length,
 dataset_num_proc=2,
 args=TrainingArguments(
 per_device_train_batch_size=2,
 gradient_accumulation_steps=4,
# Use num_train_epochs = 1, warmup_ratio for full training runs!
 warmup_steps=5,
 max_steps=60,
 learning_rate=2e-4,
 fp16=not is_bfloat16_supported(),
 bf16=is_bfloat16_supported(),
 logging_steps=10,
 optim="adamw_8bit",
 weight_decay=0.01,
 lr_scheduler_type="linear",
 seed=3407,
 output_dir="outputs",
 report_to="none"
 ),
)
Step 14: Train the Model
This is the step that does the Supervised Fine Tuning of the model. This process took several day to process when I performed the process using 8 Tesla V100 processors on the full 42K dataset.
trainer_stats = trainer.train()Step 15: Test the Results
One the fine tuning is complete, the same test run from Step 8 can be run again to see the affect of the fine tuning.
question = "A 28-year-old woman presents with a 3-week history of an intensely itchy, red, and scaly rash on the flexor surfaces of her elbows and behind her knees. She reports a personal history of asthma and seasonal allergies. Physical examination reveals lichenification and excoriations in the affected areas. What is the most likely diagnosis, and what is the primary immune pathway involved in this condition?"

FastLanguageModel.for_inference(model)

inputs = tokenizer([prompt_style.format(question, "")], return_tensors="pt").to("cuda")

outputs = model.generate(

 input_ids=inputs.input_ids,

 attention_mask=inputs.attention_mask,

 max_new_tokens=1200,

 use_cache=True,

)

response = tokenizer.batch_decode(outputs)

print(response[0].split("### Response:")[1])
Step 17: Setup the Model to Save
This step gives the new model a name to save locally and remotely and then saves the model locally.
new_model_online = "ehonour/DeepSeek-R1-Medical-INSTAGRAM"
new_model_local = "DeepSeek-R1-Medical-INTAGRAM"
model.save_pretrained(new_model_local) # Local saving
tokenizer.save_pretrained(new_model_local)
Step 18: Save the Model to Hugging Face
This step saves the model to Hugging Face. For it to work properly, the HF access token must have write privileges to save the model.
model.push_to_hub(new_model_online) # Online saving
tokenizer.push_to_hub(new_model_online) # Online saving
Conclusion
The Supervised Fine Tuning Process is an important part of creating custom AI applications and is not nearly as dauting as it appears to be.
Thanks Ed!
Everything working fine except when i try to run the trainer it causes errors in my collab .. i used T4 GPU …